How to Make Pixel Art an Image in Photoshop
Most of the time we demand high-quality pictures and portraits only sometimes we demand some pixelated picture to use in our pattern or nosotros just need pixel fine art of whatsoever picture of united states of america. I am going to prove you lot the exact method of how to brand pixel art Photoshop of any object or portrait from whatsoever picture.
Now yous've captured your picture and you wanted to make it pixelated look like one-time fun, retro, 8-bit pixel fine art.
In this situation, we have Photoshop to catechumen pictures into pixel art Photoshop makes them pixelated.
If yous wanted to learn how to convert pixelated logos or icons to loftier-resolution icons then, click here!
Now if yous wanted to learn the complete technique to make this pixel fine art in Photoshop, you just take to stick with me through the end of the article.
Considering in this commodity, I'll testify you the ultimate stride-by-step guide about how to make pixel art Photoshop and make anything similar fun, retro, 8-flake old pixelated prototype.
Step 1: Setting Up a Pixel Fine art File
In Photoshop, become toFile > New. Proper noun the certificate of your option.Gear up the file to the following dimensions:
- Width to 500 px
- Height to 500 px
- Orientation toLandscape
- Resolution to 50
- Colour Fashion toRGB
Then clickCreate.

Stride 2: Open Motion-picture show Of Field of study
Open up a photo of someone or something that you lot'd like to utilise for this project. To do that but elevate and drop the picture of the subject on your document or you lot can become to File > Place Embedded.

This will inquire you to go to the location of the pic and open it.
The start step is to re-size it, to get the results nosotros desire.
If y'all'd like to crop the bottom of your subject into a circular shape, open your Elliptical Marquee Tool, go near a corner, and press and concord the Shift key as you drag a round choice over it.
We'll cut out our subject area inside the option by pressing Ctrl or Cmd + J to brand a duplicate of the selection and we can now but hibernate the bottom layer.
Click the eyeball icon next to the bottom layer to hide information technology.
Step 3: Background Removal
Next, we'll delete the residue of the background behind our subject and mask your subject field.
There are many ways to practice this and your method should depend on the characteristics of your photo.
For this example, if the groundwork is pure white or whatsoever 1 color, you can use my Magic Wand Tool.
You can make the Tolerance 10 and make certain "Contiguous" is checked. "Contiguous" will ensure that only the white area outside my field of study will be selected.
And then I have different types of selection tools in Photoshop and some of them as well employ AI to consummate selections.
- Rectangular Marquee: You lot can select rectangular portions of an image with this tool.
- Lasso: This selection tool allows you to draw your own freeform outline of what you wish to select. This works best for those areas that don't qualify as shapes.
- Quick Option: This tool is used similar the lasso tool except it works all-time on an expanse with clearly defined edges. You drag the mouse and the outline "snaps" to the edges.
Y'all can use Quick Selection tools to do the selection and if you want to be perfectly accurate about selections you tin use Pen Tool to do that.
But how to make selections is not the tutorial so nosotros should not waste product time learning how to select objects.
Use any of the option tools you want to use and make a pick of background and and then only press delete on the keyboard to delete the background from the subject area.

In order to deselect it, printing Ctrl or Cmd + D on your keyboard.
Step 4: Adding Stroke
Now we have to add a black stroke around our bailiwick to brand information technology more await like 8-bit retro pixel fine art but it all depends on you.
Y'all tin skip this step of applying the stroke.
To add together a stroke right click on the subject layer and select Blending Options.

Now in the blending option select Stroke and in the stroke settings.
Set the color to black, the Size to v pixels, and the Position to "Outside". And so, click OK or printing Enter or Return.
Stride 5: Converting to Pixel Fine art Photoshop
Now nosotros have to apply our filter to make the paradigm pixelated. But before nosotros'll convert our image to pixel art, nosotros have to catechumen our paradigm into a Smart Object, so we can add filters and additional adjustments to it non-destructively.
To do this, right-click on the subject layer from the Layers panel and click "Convert to Smart Object".
At present we can apply Filters non-destructively, then become to Filter > Pixelate > Mosaic.
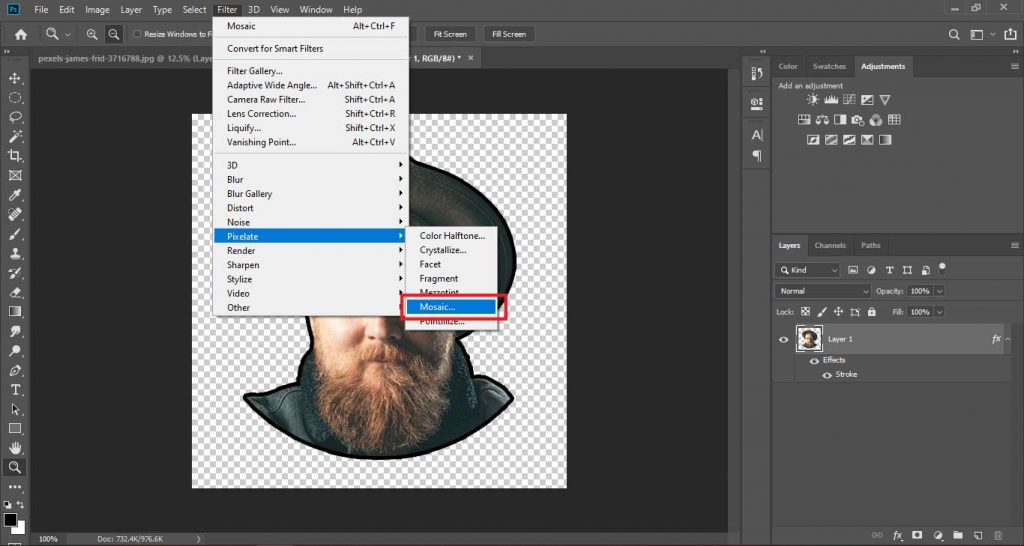
Make the Prison cell Size 10 square or you tin can use any value you lot desire co-ordinate to your preference.
Step six: Calculation Features to Pixel Art Photoshop
As you can run into we have our pixel fine art virtually set up just nosotros have to add a feature if our portrait or object needs to be shown correctly.
Next, we'll add together black and white squares to accentuate sure features of our character. I'll show you 2 ways of doing it.
First, I'll show y'all how to practice information technology if you're using a version earlier than CC. And then, I'll show how to exercise it using CC or later, which has a precise method.
Earlier Than Photoshop CC:
If you're using a version earlier than CC, create a new certificate by pressing Ctrl or Cmd + N or go to File and New. Make the Width and the Height x pixels each and the Resolution, 50 pixels per inch. The colour is black. So, click "Create" or "Open up".
To run across information technology onto your canvas at its maximum size, press Ctrl or Cmd + 0. Go to Edit and "Define Castor Preset". When this window appears, just click OK.
Open back your pixel art document. Irrespective of the version you're using, allow's remove the lightest squares forth the edge of your graphic symbol.
Become to Select and "Color Range". Choose "Highlights". Make the Fuzziness is 0% and the Range is 1.
Click the Layer mask icon to make a layer mask of the selection adjacent to the active layer.
Nosotros'll make a new layer beneath the agile layer, by Ctrl-clicking or Cmd-clicking the New Layer icon. We'll use this layer as the background.
For at present, let'due south fill up it with white, and since white is our background color, press Ctrl or Cmd + Delete. Click the top layer to make information technology agile and make a new layer above information technology.
For versions earlier than CC, open your Pencil Tool and Pencil Picker. The last thumbnail is the preset we saved before.
Click it to make it active and make sure its Opacity is 100%.
This first method requires great care in aligning it straight over the square under information technology.
If it's not aligned exactly, press Ctrl or Cmd + z to disengage the last step and try again.
To make your brush white, printing "ten" on your keyboard to invert your foreground and background colors.
Photoshop CC or After:
For those who are using CC or subsequently, go to View and "New Guide Layout". In the Columns and Rows, type in 50 pixels each and keep everything else unfilled and unchecked.
If y'all don't encounter the guidelines, press Ctrl or Cmd + H. Notice our guidelines perfectly marshal with the grapheme's squares.
Open up your "Rectangular Marquee Tool" and make certain the "Add to Selection" icon is active. This adds additional selections to our image as we make them.
Get to View and brand certain "Snap" is checked, a well equally, "Guides". This will ensure that the selections we add, volition snap to the grid.
After you've made a cluster of selections, fill it with black and deselect it.
If y'all desire to see your character without the guidelines, press Ctrl or Cmd + H. To make them visible again, repeat the same keystrokes.

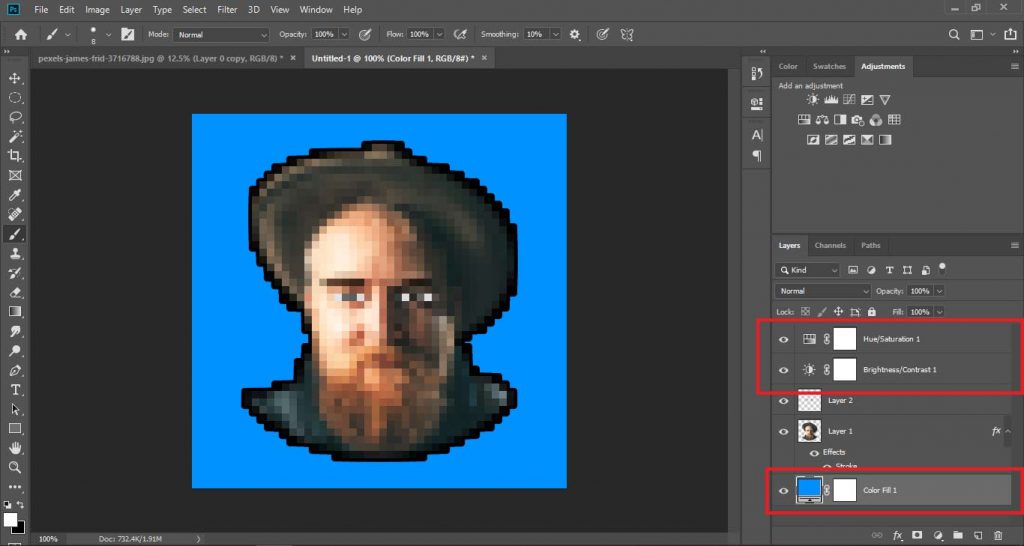
Footstep 7: Adjusting Colors and Brightness
To make the art more than pop we need to add a footling saturation and dissimilarity to our image.
To do that go to Layers Panel and make a Brightness/Dissimilarity Adjustment Layer and in its setting increase the contrast to most 20+ to forty+. You tin can besides play with the brightness to get better results.
Next get to Layers Panel and make a Hue/Saturation Adjustment Layer and in its setting increment the Saturation to about ten+ to twenty+.
Step eight: Calculation New Groundwork Color
Now we can add together a new background to our pixel art by importing information technology into the document and placing the layer of background below the discipline layer.
You tin can just make a solid color Layer and select a new color and accept the layer below the subject layer to brand a groundwork color of any color.
Conclusion
These are some steps that you lot follow you can make pixel art in Adobe Photoshop in a few seconds. Just read the article once, try it and you are good to go!
Make sure to annotate downwardly your feedback and suggestions almost the article.
Frequently Asked Questions
- What is pixel art?
Answer:Pixel art is a form of digital art, created through the apply of software, where images are edited on the pixel level. The aesthetic for this kind of graphics comes from 8-fleck and 16-bit computers and video game consoles, in addition to other limited systems such as graphing calculators.
- Where to make pixel art?
Answer:In that location are many online tools to exercise that simply the most versatile software where you tin make pixel art in Adobe Photoshop.

I'm a Graphic Designer with 5+ years of experience. Specialized in Adobe Photoshop.
Go Info Nigh Whatever Photoshop Editing, Photoshop Manipulation, Logo Blueprint, Flyers, Business concern Card, Cartoon Portrait and any type of work-related to Graphic Design and Photoshop Editing.
Source: https://www.hackgraphic.com/pixel-art-photoshop/
0 Response to "How to Make Pixel Art an Image in Photoshop"
Post a Comment